Pages

.

Hello eveybody, happy 4th Advent! :) On the first weekend of December I sold my handmade things at the Trend Mafia in Berlin, a market for everything handmade. :)
I was having my own booth and I have been waiting to finally share some photos with you for so long! :)
I already went there last year after I had just started selling on DaWanda, but I wasn't really successful. This time, it was completely different! :) I was well prepared and my range of products has become pretty wide. I offer lots of items for daily use and my products have become better and better (such as my sewing skills have improved :)).
I'm so thankful for having the best friends in the world, because otherwise, this day would have been more stressful for me! Flo drove me to Berlin and helped me to carry all my items and my friends Hanna, Anja and Sarah came to visit me and to keep company with me. <3 Anja and her boyfriend brought me the cutest Dalmation balloon (which attracted lots of children :D) and Hanna has been staying with me nearly all day. <3
I was soooo nervous when I started decorating my booth and I wanted it to look perfect and to reflect my style, so I thought a lot about how to organize everything. I made all price tags by hand and I wanted my decor to be appealing. :) When the first customers came, I was full of adrenalin. :D
I got LOTS of compliments concerning my products, people got sparkling eyes when looking at my products and I was completely overwhelmed. :)
Each person who bought something got a little paper bag with handprinted Christmas ornaments, my business card and a little chocolate Santa. Lots of people took my business cards and I sold a total of 11 differend items for a total of 75€. I was so proud, because this time, I earned the money I had to spend for the booth's rent, for the gas for coming to Berlin and I even made some profit. What is more, the following days after the market, my statistics on DaWanda nearly exploded and I sold a lot more online. :)
It was such a great experience and I had soooo much fun seeing the people's reactions when looking at my booth and at my items. It's such a great feeling that people like what I do and admire what I have created myself with a lot of effort and love. <3 I'm really proud of myself and this Sunday has been one of the best days this year. :)
So here are lots of photos so that you can see how everything looked like! :)

Hanna and I have been taking photos all afternoon and she perfectly portrayed me and my booth. <3

I've already sold this cute owl pillow. I wrote all tags in German and English so that everybody was able to understand them.

This day was simply awesome! :) Here you can see Flo and me chatting. He's the best, he totally supports me and helps me to achieve my goals whenever I need him. <3

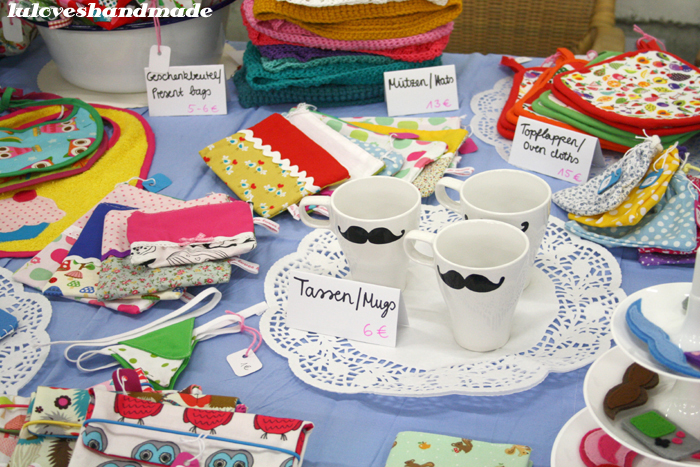
Although I've been selling lots of mugs on DaWanda, at the Trend Mafia they have only been admired, but not a single person bought any of them.

I had bought this pretty, white etagere to display my brooches. I love white plastic items (it's even made from recycled plastic :)) and I can also use it to decorate cupcakes. Moreover, I used some enamel bowls to display other items.

Flo and Hanna have been keeping company with me. :)

 I like this photo so much!

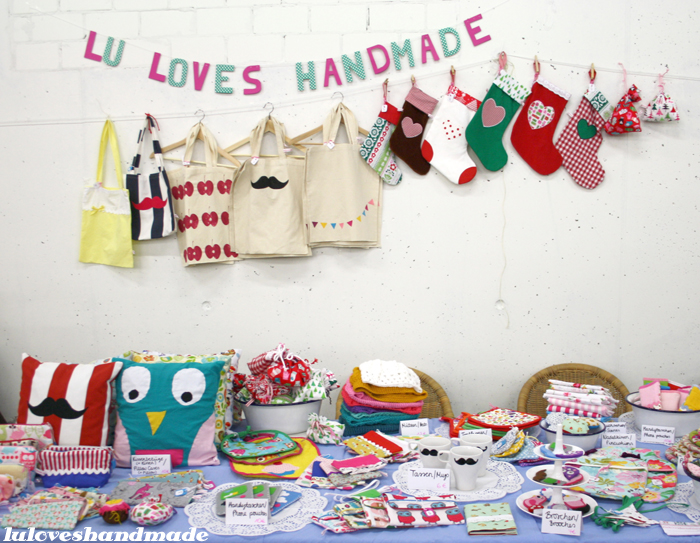
Do you see the Dalmatian? :) The 'lu loves handmade' banner is made of paperboard, I made it last minute two days before the market while Anja and I were watching O.C. California on DVD, because I didn't have any banner.

 I love those mugs! :) I know, I haven't invented this trend, but they are so much fun. :)

Here's again the wall behind my booth. I was happy that I could hang up my bags to display them so that everybody could see them. :)

Wow, lots of photos, but I hope that you were able to get a good impression of what this day has been like. :) I definitely wanna do this again next year, although it includes a lot of work and time for preparations. :)

Has any of you been selling at such a market? :)

Wish you a lovely Sunday and enjoy the last week before Christmas! As you can see, today's the first day in December I'm not sharing a Christmas post, but my Blog Party is nearly over. I wanna share one or two remaining posts the following week and then I'm gonna post a summary of all Christmassy DIY posts so that my new readers (Hello, welcome here!!! ;)) will get an overview. :)

Thank you for reading,
Lu <3
reade more... Résuméabuiyad

Hello, everyone! My name is Allie, and I run a little blog called Of All The Nonsense. I'm quite honored and excited to be a part of Lu's Christmas Blog Party.  Today I'm going to show you how to make a quick and adorable holiday wall hanging!
 

For this project you will need:
- An embroidery hoop. [I chose an oval-shaped hoop, but you could choose any one you like.]
- Fabric for the background.
- Three triangles cut from mismatched fabrics.  [Mine were between 1.5 and 2 inches in height.]
- A sheet of sticky-backed felt.
- Embroidery floss in the colors of your choice.
- Scissors.
- An embroidery needle.


1.  Before you place your fabric in your hoop, trace around the inside of your hoop on the back of your sticky-backed felt.  I forgot to do that beforehand and had to take my fabric out!
Once you've finished with the felt, place your background fabric in your embroidery hoop, and line up your triangles wherever you would like them.  I used a couple of pins in each to help hold them in place.


2.  Using embroidery floss in the color of your choice for each triangle, stitch around each one.  I used a simple running stitch.


3.  Once you've stitched all around of your triangles, stitch a small trunk to the bottom of each one.  I chose not to fill my in, but you could fill yours in if you like, using a satin stitch or something similar.


4.  After I finished with the tree trunks, I thought it would look cute to stitch a small star to the top of the middle tree.  To do this, I basically just made small single stitches in the shape of an asterisk.  You could even stitch a star to the top of each tree, if you like!


5.  Now it's time to finish off your wall hanging.  I finished it by trimming my fabric closely to the back of my hoop. I know that there are better methods of finishing off embroidery hoop pieces, but this has generally worked well for me in the past. [If you know of any other methods, please feel free to share!] Do make sure you pull your fabric tight before trimming!  After you've trimmed your fabric, remove the wax backing off of your felt, and lay it sticky-side down in the back of your hoop, covering your stitches.  


6.   And there you have it - a super easy and adorable wall-hanging, that you could even leave up all winter!  I love this project because there are so many different designs you could do.  If you make one of your own, I hope you'll share photos!

Thank you so much for having me, Lu!  It's been such a joy!
Happy holidays!
xo, Allie

***
Oh, it's so pretty! :) I'm so thankful for all the lovely ideas all of you have been sending me. :)
Thank you so much for participating, Allie! :)
Lu <3
reade more... Résuméabuiyad
Today's guest blogger is one of my beloved girlfriends, Anja, who writes a blog called aentschie and who sews the cutest toast iphone cases in the world. <3

***

I have been making two gingerbread houses and my loved ones Lu and Sylvio got something to nibble. :)
Such a delicious house can be made easily:

You need:  
- Gingerbread dough for the house
-Lots of sweets for decoration
- Icing sugar


You have to use your favourite gingerbread or cookie dough and then you have to cut out the parts of the house (front, back, two pieces for the sides and two pieces for the roof).

Bake the dough according to the recipe, let it cool down and buy lots of sweets and icing sugar.


Sticking together the pieces of the house is a bit tricky. It works best with melted sugar (caramel). Be really careful, because it’s extremely hot and you can get a burn blister. :(


When everything sticks together and you’ve tested the house’s sturdiness, you can get started with decorating your house (and because then you later don’t see how leaning it is ;)). Use icing sugar and liquid (just like you want it, you can either use water, or juice; I prefer lemon juice (white) or cherry juice (red)) to mix the icing. The icing has to be really thick so that it sticks well and does not drip. An injection bag works best for applying the icing to the house (you can also use a freezer bag with a little hole in one corner!). Finally, decorate the house with sweets to your heart’s content! :)


The houses look so delicious!
I don’t like recipes and indications of quantities that much, but in case you have any question concerning any detail, feel free to ask me. :)
So just try it out, such a house is an awesome present idea!
I wish you a lovely pre-Christmas period!
*aentschie

***

Doesn't that looks cute?
Thank you for sharing, sweetheart! <3
Lu
reade more... Résuméabuiyad

Hello!  This is Ashley from under those neon lights, the best blog to ever exist in the entire history of the world... the world ;)
I hate Xmas and refer to it as Xmas because I hate it so much!
BUT I do LOVE to make and decorate things, so of course I love to wrap presents!
Here is a little idea to make a present a little extra special and handmade!


You will need:
Scissors
Embroidery Thread
A needle
Buttons
Felt
Ribbon
And a teeny little puff of polyfil


First:
You need to cut out a gingerbread man shape.
You can trace a cookie cutter or make your own shape. You can even make a gingerbread kitty or a gingerbread house or a gingerbread owl or a gingerbread... you get the idea.
Make sure you have two identical pieces of felt.

Second:
Decorate!
Give him eyes, some frosting, shoes, buttons, maybe a beard or mustache.... but NO SMILES!!!  Because of course we hate xmas! ;)


Third:
Sew him up!
Make sure you leave room to attach a little ribbon and to fill him with a little bit of polyfil. You want him to look well fed, not fat, so don't overdo it!

And lastly,
attach him to a present with a ribbon, bow, or yarn!

The best part about this little guy is that the recipient can use him to decorate their tree next year!

***
Yay, so cute, thank you for sharing this, Ashley! :) Lu
reade more... Résuméabuiyad
Hey, are you in mood for the holidays? :) I thought Mogli might look pretty with a little bow tie for Christmas (isn't he the cutest? :)) and this is why I sewed him this one. It is made from red cord and I used a velcro to close the collar. The fabric is really soft and thus, the collar is extremely comfortable and doesn't bother him.
I think it's soooo pretty and that is why I also listed it on DaWanda. Yay, I immediately sold one after listing the item! :)
What do you think? :)
Wish you a nice day and come back tomorrow for the next guest post for my Christmas blog party! :)
Lu <3
reade more... Résuméabuiyad

Hey Lu loves handmade readers, it's Stefanie from Squeaky Swing. I want to share with you my very easy Christmas garland.
I was inspired by a sweet photo on this blogand thought it would be a cute idea for decorating my home for Christmas. I'm not sure how the original was made, but I decided to make my own garland with felt letters. So here are the instructions:

Supplies:
- white felt (about 15x15cm  x 2 for each letter)
- cotton wool to fill the letters
- glittery stones (from the arts and crafts shop) and glue
- a big needle
- thread
- nylon thread 


1. Print out the letters in any font you like (I made them really big: two letters on one sheet), put them on the felt and cut out each letter twice, front and back. M, R and S only have to be printed once. 
2./3. Sew the front and back of each letter together, leaving a little space open to fill them. Then close the hole to finish one letter. Repeat this with every letter. 
4. Take the nylon thread to stitch the letters together.
5. Finally glue little glittery stones onto every second letter to give it the final touch. 

I hope you like it!
Merry Christmas, Stefanie

***
Dear Stefanie, thank you for sharing, this is so pretty! :)
Lu
reade more... Résuméabuiyad

Yay, 15% discount on all Christmas items like stockings and present bags in my DaWanda shop. :)
reade more... Résuméabuiyad
Hi everyone, thanks Lu for letting me contribute to your Xmas blog party. 
I'm Heidi, I have the blog Imwithleia - I blog from Copenhagen with a focus on my love for handmade things. I'm sharing with you a recipe for Candied Almonds. It's a classic Scandinavian Xmas treat - nice and so simple. The perfect little gift.
You need:
200 g Almonds
175g Powder sugar
2 tablespoons grounded cinnamon
10 cl water

Wash and dry the almonds, 10 minutes in the oven on 175 C
Mix powder sugar and cinnamon
Add it with the almonds and the water to a hot pan. Remember to stir all the time. Continue to the sugar has melted and it smells a bit burned. Cool down on some baking paper. Break a part. Enjoy

***
Eeeeks, thanks for sharing, it sounds soo delicious! :) Lu
reade more... Résuméabuiyad

Hi there everybody! I’m very honored to be invited as a guest author here on „luloveshandmade“ today. I normally post over at “Fee ist mein Name” which means “Fee is my name” and that’s true, because… well… Fee is my name ! I brought with me a little DIY combined with a yummy recipe: Nonalcoholic punch jelly. I made these glasses as little presents for my family and friends and everybody loved them. They can even be used for storage when the jelly is all gone. So, here we go…

First, I did the crafting part. I took a bunch of little jam glasses and spray painted the lids gold. Take care that your spray paint is suitable for metal undergrounds. I let mine dry for about 24 hours before taking the next step: Gluing some decoration onto them. I chose cinnamon sticks, dried orange slices and star anise. First, I tried hot glue, but it dissolved the spray paint, so I switched to universal adhesive, which worked out fine. Let the lids dry for another 24 hours before using them.

For the jelly you need: 1 litre red grape juice, ½ litre apple juice, 1 big orange, 2 cinnamon sticks, 6 cloves and 1kg jam sugar 2:1. Take a big pot and pour the juice in. Squash the orange und pour its juice into the pot as well. I use a tea filter to pour it through, to make sure that no pieces of fruit make it into the pot. Then take a second tea filter, put the cinnamon and the gloves in it, close it with a piece of thread and put it inside of the juice. Bring to boil and let it simmer for about 30 minutes. Remove the spices and let the punch cool down. Afterwards add the jam sugar, bring to boil again (with constant stirring) and let cook at a rapid boil for one minute. If you wanna test if it’s gelatinizing properly, take a cold plate and put a few drops of your jelly on it. Hold the plate upright and if the jelly starts thickening fast and sticks to the plate you can pour it from the pot into your prepared jam glasses. Close the lids quickly, but be careful not to damage your decoration. The jelly should be cold and ready for consumption after a few hours.

A similar recipe was my first attempt of making jelly (or jam) a few years ago, when I had just moved out from home. So if you never made some before as well: Try it. It’s so easy !

Thanks Lu for having me today and everbody else: Have fun cooking and crafting!

***

Dear Fee, thanks for sharing this pretty idea! ;)
reade more... Résuméabuiyad
Hello there!
I'm elycia from the blog ♥elycia. I am a vintage loving cat lady living in a cute house on a quiet street with my husband and our two sweet kitties. Today I am happy to be here to share a little decor DIY with you. This year Ivan and I decorated an adorable white tree with purple and blue ornaments to match our living room. After the tree was all decorated I got the idea to make some "balls of yarn" to add to it. Here is what I did!
For these yarn ball decorations you will need some styrofoam balls (any size you like) and some yarn in colours that will look nice with your tree and other ornaments.
Start wrapping yarn around your styrofoam ball. It doesn't have to look perfect right away.  Make sure you change the direction that you are wrapping every so often the way I did.
Once you can no longer see your styrofoam ball and you are happy with the pattern you have made with your yarn, cut the yarn and leave a longish tail.
Secure your yarn by weaving the end under a few of your wrapped pieces.
I used my yarn tail to make the hanger for my ornament. Just make a loop large enough to fit over the branches of your tree. Then tie a little knot and secure by weaving once more through your wrapped yarn.
Next I weaved the end down to the bottom of the ball and trimmed it so that there was a little tail hanging. You could also trim the tail completely so that there is none hanging down if you prefer.
Place on your tree! If you kept a hanging tail you can play with it and wrap it around your branches a little bit. These yarn ball decorations are super easy to make and I love the way they look hanging on my tree! All of my balls are the same size but I think it would also look super adorable if you used a few different sized styrofoam balls. I would love to see if you make some yarn ball ornaments for your tree! Pop by my blog and leave me a link if you do! ♥elycia

***

Thank you so much for sharing, I'm happy you took part in my blog party! :)
Lu
reade more... Résuméabuiyad